a study in half-sword from Gladiatoria
by Vincent Moroz
Without doubt one of the most important fighting manuals to be available to the modern western martial arts practitioner is the anonymous, mid 1400’s, Gladiatoria. Not so much as a complete syllabus of weapons or techniques, but because what it contains is incredibly well explained and demonstrated. Unlike many other fighting manuals that survive to modern times (such as Talhoffer’s 1467 or de Liberi’s Flos Duellatorum) it contains clear images combined with clear text, allowing us to follow along through the progression of techniques often with attack and counter in each plate. Not that Gladiatoria is a primer for the uninitiated, as like most medieval Fechtbucher it expects that you will have a certain basic level of fighting knowledge when you pick it up to read.
Gladiatoria in general is meant as a set of techniques geared for use in the uniquely German judicial duel of medieval times. I make this statement from the opening sentence of the first page of spear fighting where it says: “When you first step into the lists and become aware of your opponent, then take your shield in your left hand and ready the spear for a strong thrust from above.” While this may be the main battle ground the author envisioned for the techniques, they are still lethal fighting skills to face an opponent with that could be used in times of larger conflict. Individual fighting skills and techniques add up to create the knowledge base required to advance to group tactics. Group tactics are generally not demonstrated in medieval fighting manuals.
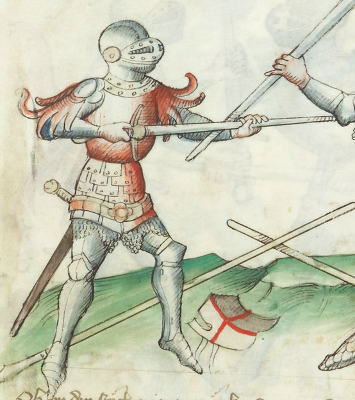
Fighting with the armour hand, also known as half-swording, is a technique for armour-clad opponents where the intent is to seek openings in your opponent’s protection with precision stabbing or thrusting. The sword is held with the strong hand on the grip and the weak hand on the blade roughly in the middle creating a very stable set of guards that could be used for techniques from stabs, smashing attacks and throws. While armour hand can be used while fighting without armour, why would one give up the advantages of blade length and the three wonders of strike/cut/thrust when they can all be applied in Blossfechten? The time to give them up is when they have no value such as attempting a strike or cut into plate steel. Half-sword is a technique of Harnishfechten, one step closer than Blossfechten, and should generally be used in this context.
Gladiatoria gives us a relatively simple system for fighting with the armour hand. Not simple because it is elementary, but because it is not over complicated with dozens of useless guards. While it demonstrates 50 separate techniques including the counters, it uses only 4 main guards to start from and 2 transitional postures. Windings and turnings are used to move through the system. It is important to note that a true fighting system will not be overly complicated as the mind falls back on training in times of extreme duress, such as when you are fighting for your life, and your fine motor skills disappear making flowery movements all but impossible. Gladiatoria demonstrates the KISS principle.
One interesting item from Gladiatoria’s armour hand images is the lack of gauntlets (armour on the hand) in most of the techniques. By and large the combatants are using bare hands while fighting with armour hand, perhaps indicating they preferred manual dexterity to hand protection. Only in pages 26v and 27r do we see the fighters wearing gauntlets. Certainly there is little danger in being cut by holding a sword with a bare hand so long as you do not slide your hand along the blade. When conducting armour hand techniques one must therefore be careful not to slide the hand on the blade but hold it to guide rather than thrust. Instead drive with the rear hand which is safe on the grip.
It should be noted that more than one version of Gladiatoria exists and they are each slightly different. Pictures in this article have been pulled from both the Krakow and Vienna editions, with the page and edition being noted below the pictures used.
THE GUARDS AND TRANSITIONAL POSTURES
Picture 7v of Gladiatoria (pg 14 of Hugh Knight’s translation) starts the techniques of armour hand. Here it says: “Note that now you have lost spears and shields: Take your sword at the armour hand and wind it above your head as you have learned; this position leads to all the thrusts and strikes as you well know how to do them.” 1 Several things are apparent from this statement: a) use of the spear was first in the fight; b) after pole-arms the fight goes immediately to armour hand for armoured opponents; and, c) the expectation is that you already know what you are doing.
There are four guards demonstrated in Gladiatoria, all are found on the first two pictures in the technique series, 7v and 8r. These two plates are the only ones in the series that do not show the fighters closing into further described techniques and are summed up nicely with the sentence: “These are the first two techniques deriving from the four guards of the sword that are described before the other sword techniques.” 2 Each of the pictures below show two guards, one high and one low, contrasting the guards themselves nicely.

7v (Krakow)

8r (Krakow)
For ease of learning I have arranged the four guards into what I consider a practical sequence for memory and practice. In earnest the guards would be used based on the tactical situation and not in any sort of artificial order. I believe these guards are paired together in the pictures above on purpose as they are meant to meet each other in the openings demonstrated.

Guard 1
Guard 1: Held low with the hand on the grip behind the body, this guard positions the body for stabbing attacks. It also works well with the two transitions and is a good guard to begin the Mordschlag as it somewhat hides the intent behind the body and allows a full strike.

Guard 2
Guard 2: Held forward to catch attacks, like a pugilist’s hands. The hand on the grip is in front of the body and the sword held forward guarding the body. It allows for quick deflections and stripping the opponent’s forward hand off his sword.

Guard 3
Guard 3: Held high with the hand on the grip behind the head, this guard positions the body for stabbing attacks, disarms and throws. It also transitions well to the Mordschlag although your intent is more visible to your opponent.

Guard 4
Guard 4: Held high with the hand on the grip in front of the head, this guard positions the body for disarms, joint punishing and throws. It offers an opening that your opponent may find irresistible.
Mordschlag (Transitional Posture 1): From either guard one or three release the hand from the sword grip and place it on the blade, holding the the weapon like a club. This positions your hands for a smashing attack consisting of a pommel strike to either the head or the upper arm. The articulating joints of the elbow may also be struck to reduce your opponent’s mobility but this is not specifically demonstrated in Gladiatoria. Keep a firm grip on the blade when conducting the Mordschlag, do not let your hands slide during the strike or you will be cut.
Dringen (Transitional Posture 2): Bring the hand on the sword grip up to the chest with the pommel under the arm pit and allow the blade to turn in the hand as it repositions. Push the point into the mail under the arm or onto the breast plate where you can force your opponent back and off balance, do not let up the pressure so he is forced to attempt to disengage and cannot counter-attack. If the point goes into the mail it can spread the rings and cause a puncture wound, if he falls you transition to other attacks to finish.
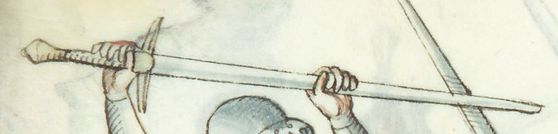
The grip used on the sword during armour hand techniques is consistent, the thumbs face each other. The hand on the blade is somewhere near the middle while the hand on the sword grip maintains a normal hold that is close to the cross. Hands are generally wrapped around both blade and grip except occasionally when the sword is catching a strike. Executing the Mordschlag is the only time the grip changes, in this instance thumbs both point toward the pommel.
Moving between guards is therefore a matter of thrusting, winding and turning rather than releasing your hold on the sword which allows for faster transitions and fluid movements between techniques. This is very important to keep in your mind as if you work with the four guards and two transitional postures you will find that they flow very fluidly up and down, or with body movements. A study of the techniques in Gladiatoria will clearly show the winding potential and the speed it allows in this close-in fighting.
TECHNIQUE GROUPS
When examining the techniques found in Gladiatoria one finds they break out into five separate technique groups along with the related counters. In some cases the counters span more than one picture and page.
- Stabbing attacks. Using the point to attack face, hands, feet and other areas around the plate, even if mailed.
- Smashing attacks. Refers to the Mordschlag with the main targets being the head and upper arms. Gladiatoria demonstrates no other target areas.
- Disarms. Taking the sword away from your opponent, or, removing a hand from the blade so he is unable to complete his intended attack.
- Throws. Using the leverage of your blade or pommel on his neck or legs, Ringen, or pushing him over with Dringen.
- Joint punishing. Breaks or locks on the shoulder, wrists and elbows.
These will be examined in the examples below.
Stabbing Attacks:
In general there are only a few places you can stab a man in full armour with effect. Gladiatoria demonstrates very few of them directly but begins numerous techniques from the starting point of the combatants stabbing at each other. The focal point of many stabbing attacks is the face as this would often be unprotected in combat due to the fact the visor was often up or off to allow for greater visibility. We do not see this in Gladiatoria, but it is often shown in other fight books.

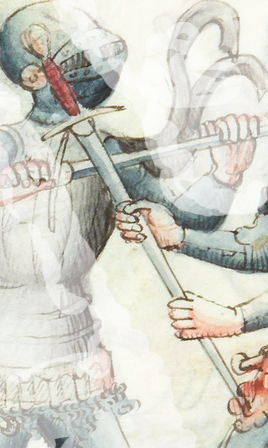
7v (Vienna)
In this picture the knight on the right is attempting a stabbing attack from guard 1 or 2 to the face. The defender on the left intercepts this with a stabbing attack of his own to the forward hand of his opponent. The intent is to deny the use of the hand permanently.

17r (Vienna)
Here is demonstrated a defense against a Dringen throw. The knight on the left moves his opponent’s push off his chest to under his arm while stabbing into the other’s foot. Sabatons were optional wear in foot combat and they would not be made of as heavy material as a helmet or breast plate.
Smashing Attacks:
As mentioned, Gladiatoria only tells of two main targets, the head and the arm between the elbow and the shoulder. There are five techniques that demonstrate the Mordschlag and its counters. The two attacks to the head result in throws while the two attacks to the arm are countered with displacements.

9v (Vienna – attack to the head resulting in a throw.

10r (Vienna) – Attack to the arm with displacement.
The fifth Mordschlag plate does not give a specific target:
“If you have made him lose all his defense, spear, shield, sword and dagger then strike him with full strength with the pommel of your sword where you know you can hit him hardest so that you can make him fall down.” 3 In WMA the intent is often to make your opponent fall, this art is stand-up.

28r (Vienna) – “…strike him with full strength.”
But there is always hope so long as you can fight, the naked warrior never any less dangerous than the one armed. The weapon-less knight shoots in quickly and performs a move very close to the first move of the three wrestlings. Once again, a throw is in progress.

28v (Vienna) – Defend with a throw.
Disarms:
In Gladiatoria a disarm may be a full take-away of a sword or more likely it will simply be the pulling of one hand off the sword. In this type of fighting your opponent will be at a significant disadvantage if he is unable to grip the sword with two hands and continue with armour hand techniques. He may even suffer a serious cut as you pull his hand off the blade denying him further use of his hand.

7r (Vienna) – Disarm from guard 1 or 2.
“Note the second technique of the sword: if he has brought his sword over his head ready for the thrust and means to thrust vigorously towards your face then get ready and thrust from below with the point of your sword over his left arm and underneath his sword and pull your point powerfully upward so that his hand comes off his sword like you see it in the picture above” 4 The picture below left demonstrates the same type of movement from a high guard while below right shows a disarm with the pommel. A mere winding, combined with your follow-up intent the difference in choice.

8r (Vienna) – Disarm from guard 3 or 4.

8v (Vienna) – Single hand strip with the pommel.
Below is a complete sword disarm by the knight on the right. Both attack from guard 3 and end up in the position seen in the picture. Right gets inside of Left and grabs both swords with his left hand while pulling up and back with his right hand using the cross to strip the sword from Left. This is very much like other sword strips in Blossfechten where both blades are grasped.

16v (Krakow) – Complete sword disarm.
Throws:
There are many throws in Gladiatoria ranging from techniques involving sword leverage and all out Ringen. Plenty of trips, plenty of leg grabs. We have seen throws already as the outcome of the Mordschlag plates as it seems many counters result in throws. Below are a few other examples.
The play below is the third frame in the armour hand plates and shows the end result of guard 4 meeting guard 1. Right attacks with guard 1 to Left’s guard 4. Left steps forward and winds his point down to meet and displace the attack, afterwards driving the point under Right’s knee and pulling up to throw him.

8v (Krakow) – Throw from guard 4.

11r (Krakow)
“Note the sixth technique of the sword: If he has set his right foot and has struck the Mordschlag to your head then catch the strike with your sword in between your hands and step with your left foot outside of his right foot and catch with your point at the left side of his neck so you can thrown him onto his back as you see in the picture above.” 5
Dringen is a combination thrusting attack resulting in a throw. With the point pressed firmly into the breastplate or mail under the arm you keep in contact with your opponent until he falls, all the while unable to counter you due to this movement. If you let up the pressure he will be able to counter. Follow up the throw with other techniques.
This last example is the counter to the disarm in 16v (Krakow). Left sees that he is about to lose his sword and pulls the tips behind him with his left hand. He then reaches down with his right hand and grabs Right’s forward knee whilst putting his left arm over Right’s head. He lifts up with this right hand and pushes down with his left hand to complete the throw.

17r (Krakow) – Counter to disarm of 16v.
Joint Punishing:
Gladiatoria refers to these types of techniques as strass der glider 6, meaning roughly the road to the joints. It may be called an arm break in other texts. In these techniques you seek to leverage or break the joint, or, force your opponent to give up his position to one less favourable to avoid your punishment. Throws often result.
Below are two example with one demonstrating a wrist punishing, and the other demonstrating an elbow punishing. In each case the attack comes from guard 3 and the defender winds his pommel into the joint and pulls down and forward after deflecting the attacking point to the outside.

13r (Krakow)

13v (Krakow)
The technique immediately below manipulates the shoulder to a forward throw. The next technique demonstrates the counter throw. This illustrates the point that not only is there always hope, but if you read the intent of your opponent you may be able to interrupt his efforts and regain the lost initiative if you can move quickly. To gain the throw in the picture on the left you must release your forward hand from the sword and put the blade under his arm where you will grab it again to turn the point forward. Note the position of the legs for the throw.

20v (Krakow)

21r (Krakow)
SUMMARY
There is an easy to learn curriculum in Gladiatoria for fighting in armour with swords: armour hand. The technique examples are straight-forward and cover the potential weak points of an opponent with few weak points. Don’t look to learn a set of dance steps, look to understand a set of available options that can be exercised as openings as opportunities present themselves. Never lose hope, never quit. There is always a counter if you move quickly enough.
DISCLAIMER
These techniques were not developed with sport in mind and are VERY DANGEROUS. This article does not contain any safety points and you therefore use these techniques at your own risk. I urge you to practice any of the material found herein ONLY under the guidance of a qualified western martial arts instructor. Take special care if you are using steel swords and always wear appropriate safety kit. Practice slow, learn fast … but practice slow to maintain control!
WORKS CITED
- Gladiatoria, Biblioteka Jagiellonski, Krakow: Ms. Germ. Quart. 16, NR, 5878 1989 ROK, Translated by Hugh T. Knight Jr, 2008. Quotes: 1 – pg 14; 2 – pg 16; 3 – pg 59; 4 – pg 17; 5 – pg 21; 6 – pg 25.
- Kunsthistorisches Museum, Vienna, Austria: Anon. MS. KK5013.