by Jan Deneke with Mark Winkelman and Stacy Stocki
Summary
This paper describes 10 new reaction drills for German Longsword, designed to be used in training, as a tool to prepare the student for sparring. The drills described will also allow the student to gain better control of his weapon, increase speed and reduce telegraphing. It requires the student to be familiar and having practiced separately the techniques described herein. It is recommended that steel weapons are used for this drill as this is the only way for the techniques to work properly.
Introduction
As a student of German Longsword I find that the most difficult part of the Art is to make techniques that I have practiced work in sparring. Due to the excitement of the bout, the fact that your sparring partner is unwilling to let himself be killed and the speed of the action, technique in general deteriorates during sparring. Things that seemed easy during the technique drill suddenly become much less so. That is one of the reasons why we spar in the first place, to recreate as closely as possible the feel and chaos of a real fight. To transition from pure drilling to sparring the Calgary chapter of the AES uses what we term ‘reaction drills’. This is not a new concept and has been described in similar form elsewhere, especially in the works of Christian Tobler (1,2), which are didactically extremely valuable and highly recommended for any student of the Art. In the grand scheme of things, reaction drills fall between technique drills and sparring. The normal the progression is footwork => basic strikes => technique drills => reaction drills => sparring. The drills described are used by the Calgary Chapter of the AES during regular practice and are presented here for the first time.
How to carry out these drills
The exercises described here are partner exercises, requiring at least two students, ideally of similar size and skill. However, it is very important to randomly change partners once you understand the drill, as that will further improve your understanding of what you are doing. Both participants must attack and defend in each drill. It is assumed that you understand and have practiced separately the techniques described in each exercise you are attempting. The techniques used here are taken mainly from the Ringeck manuscript (3), specifically the interpretations of Lindholm & Svard (4). Whenever there is a branch in the drill, the party on the bottom of the branch gets to decide what to do. It is the task of the other party to react and implement the correct follow-up technique. This is the core of how reaction drills work. A word regarding binds as used in these exercises: When entering a bind, both parties will always assume that the bind will be soft and attempt the appropriate follow-up, thusly testing the bind actively. If that follow-up fails (usually – but not always – a thrust to the face) then the bind is hard and whoever has the initiative must change his plan accordingly and implement the appropriate technique for a hard bind.
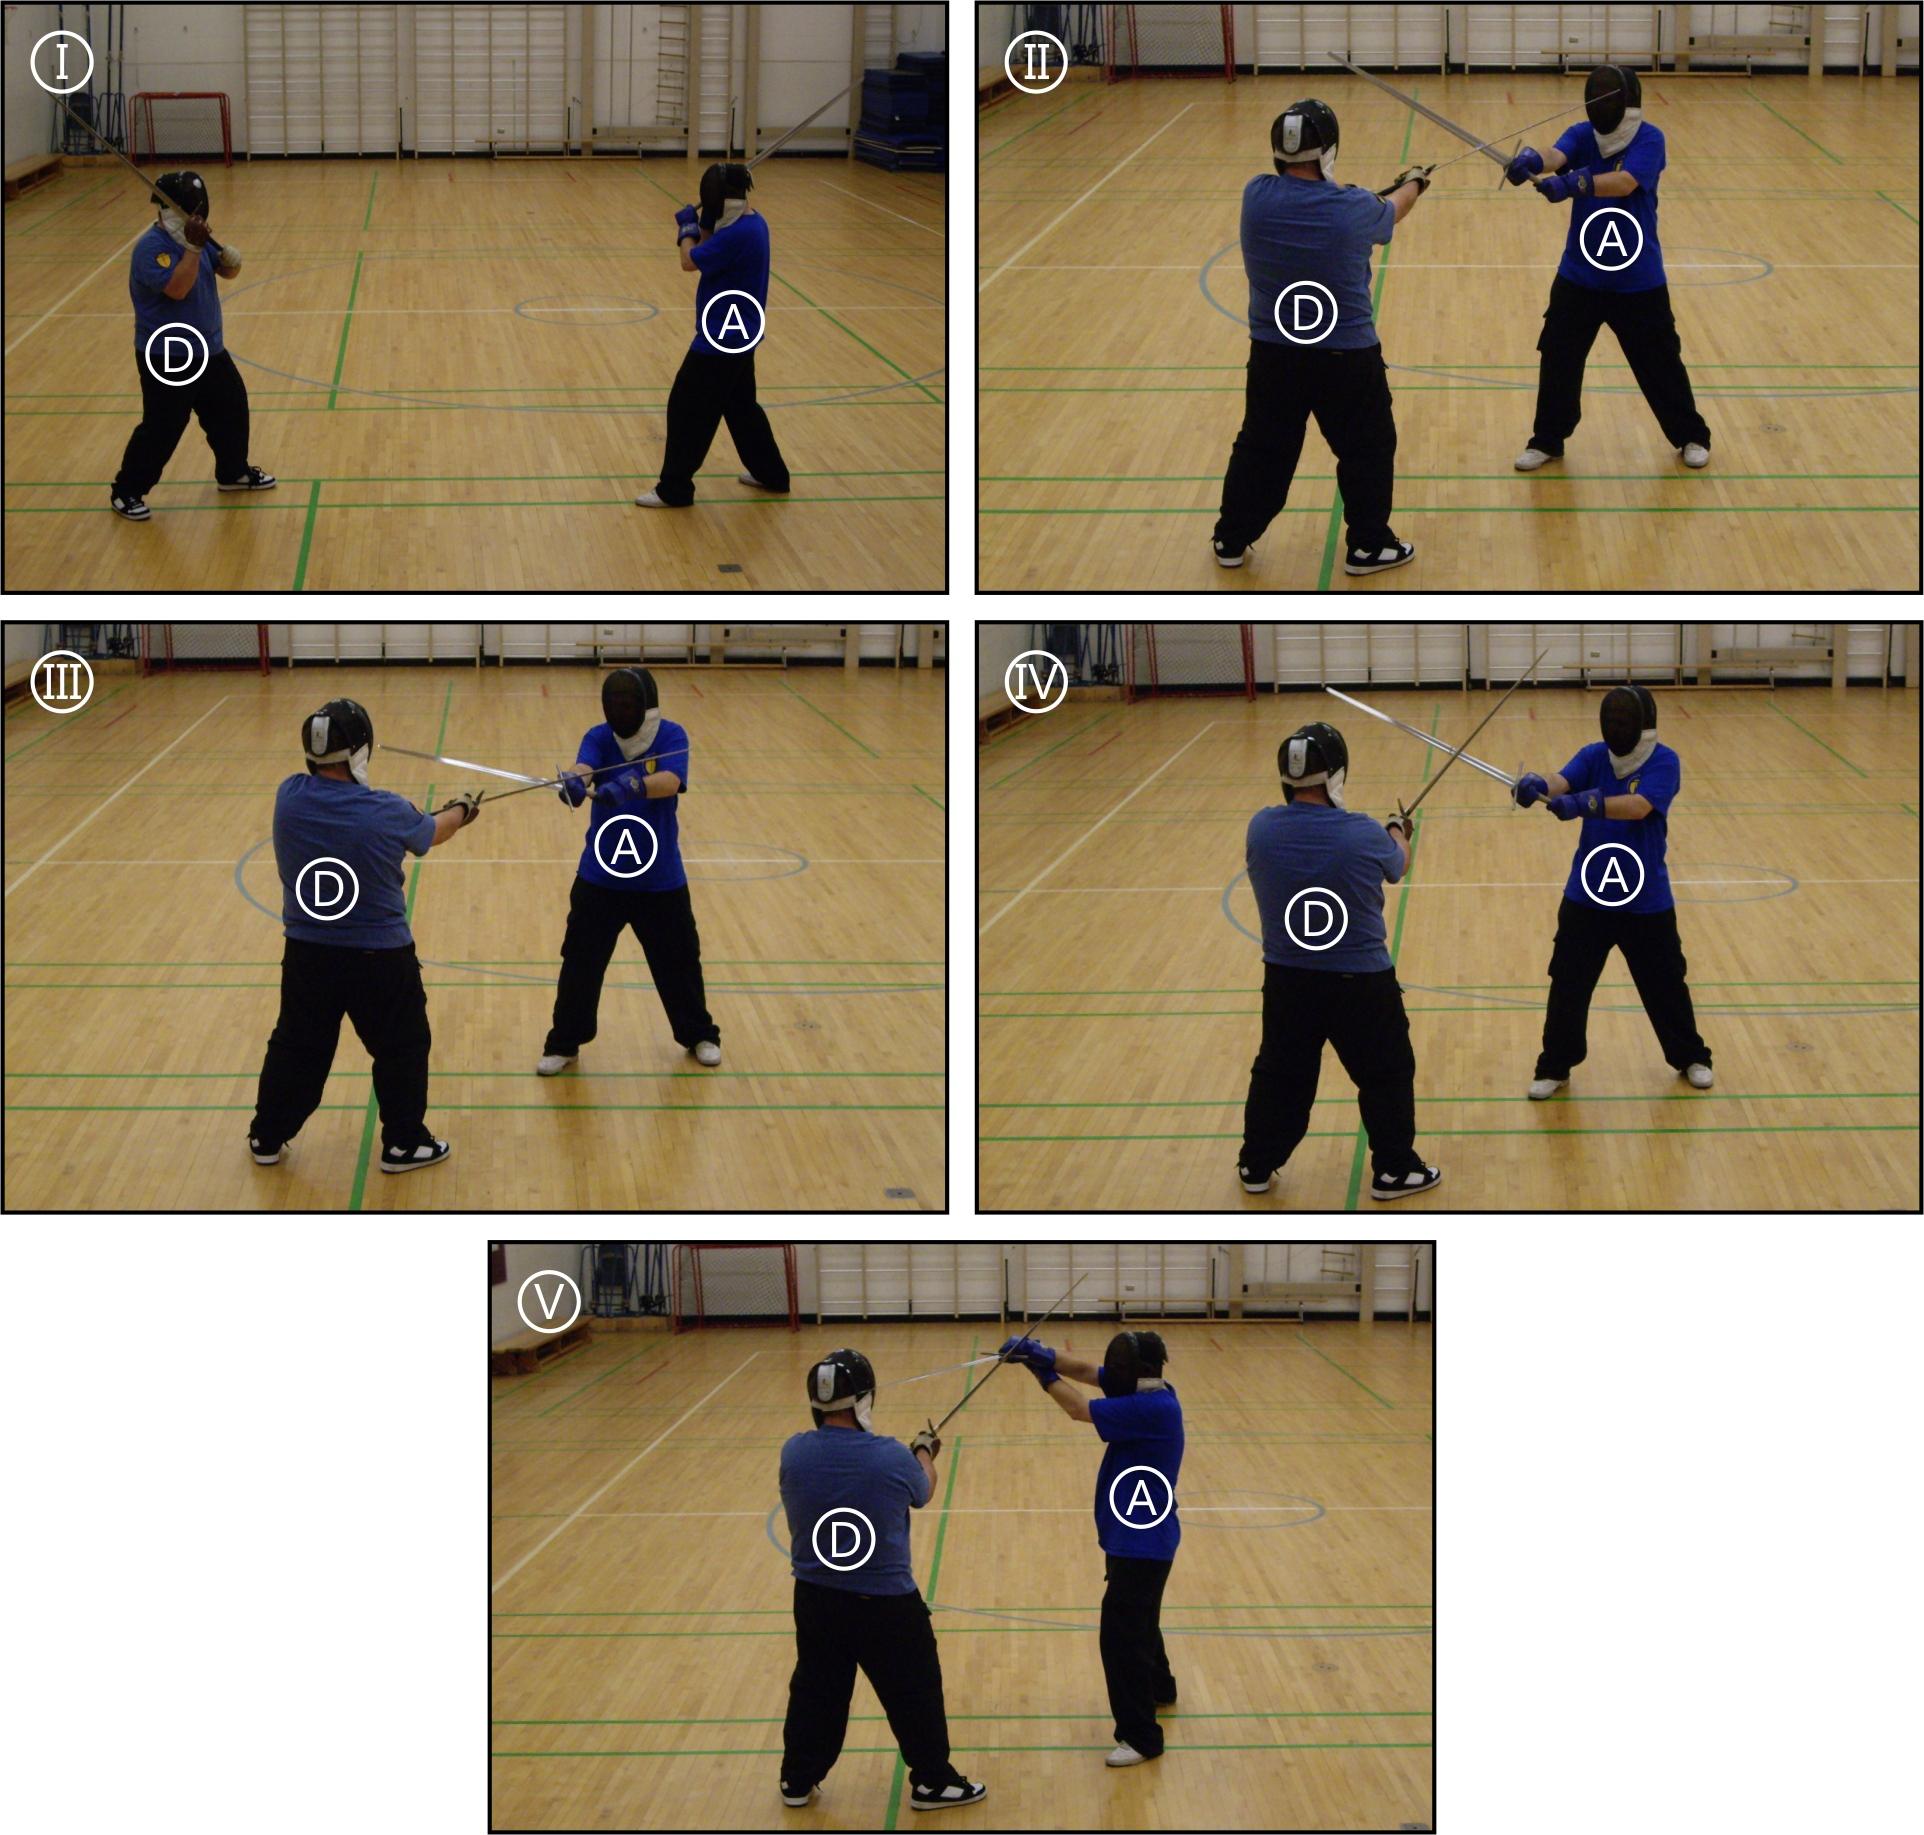
Figure 1. Series of pictures demonstrating the drill in the flowchart depicted in Figure 2. The Attacker is marked with an A, the Defender with a D. The picture-sequence (marked with Roman numerals, I-V) is corresponding to the Roman numerals shown in Figure 2. Swordsmen: M. Winkelman (A) and G. Thompson (D).
Two things to note: First you need to start the drills slowly and speed up as you feel more comfortable. Second, testing the bind should be as fast as possible. Ideally it should take much less than a second. (Mark Winkelman, personal communications). Of course protective equipment (fencing mask and gloves) is a must. Blunt steel weapons are highly recommended when carrying out these exercises, as they give the best tactile feedback out of all the available sword analogs. If steel is not available aluminium is a reasonable substitute with wood wasters being a fallback option, however wood wasters are decidedly inferior. The reaction exercises described here generally do NOT assume same-handed partners. However, training with a cross-handed partner can be confusing, especially for right-handers who have to do so less often then lefthanders. When training with a cross-hander always be clear which side the attacker and the defender are moving to. Also, make sure, that these drills are performed in a controlled manner! It is vital that any practitioner who attempts these exercises start out slowly and only increase the speed of the drill within the limits of their control!
Figure 1 shows how to read and implement Exercise 1, which is depicted in Figure 2.
The attacker (Figure 1, I, A) is seen striking a Zornhau at the Defender (Figure 1, I, D). The Defender binds with a Zornhau in the normal (middle) distance (Figure 1, II). It is the defender who decides how far or close to bind. The attacker is always aiming for the defenders neck. The attacker then tests the bind by trying to thrust at the defenders face (Figure 1, III). If he succeeds the bind was soft and the thrust to the face hits. The case shown has the defender binding the attackers blade firmly (Figure 1, IV), the attacker then uses a Duplieren to hit the defender in the head (Figure 1, V).
In the flow charts colours are used as follows: The Attackers actions are on white background. The defenders actions are on grey background. A red box means that the acting party should kill the other with this technique.
The reaction drills
Exercise 1:
This drill deals with the Zornhau and the resulting Zornbind. It was chosen as first technique, because the Zornhau, the resulting bind, the follow-up techniques and the counters are maybe the most effective and often used techniques in the entire Liechtenauer school. This first exercise deals with the different ranges and follow-up techniques for each range.
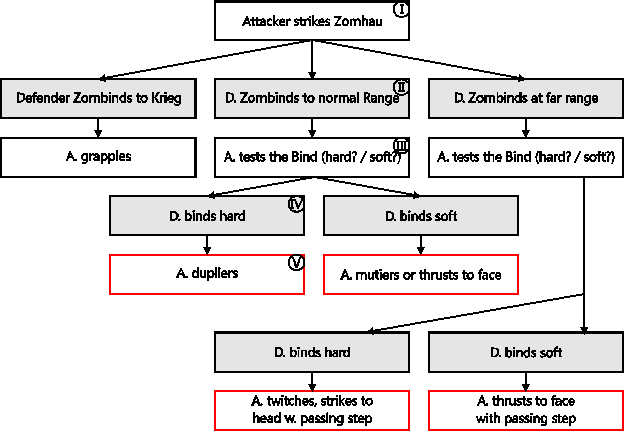
Figure 2. The Zornhau and Zornbind variations. The fields with roman numerals are shown in Figure 1.
Techniques drilled: Zornhau, Zornbind, Duplieren, Mutieren, Zucken (Twitching), Thrusts.
The attacker tries to: strike a perfect Zornhau, testing the bind and follows up with the appropriate technique, depending on the outcome of the test.
The defender tries to: strike a perfect Zornhau and Zornbind at different ranges, making it as difficult as possible for the attacker to test the bind.
Starting position: any upper guard, from which a Zornhau can be struck.
Exercise 2:
This drill teaches to recognize the difference between a Zornhau and a Krummhau and a counter to the Krummhau.
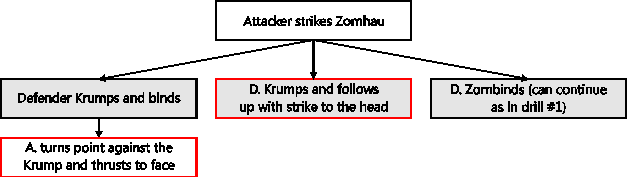
Figure 3. Differentiating between a Zornhau and a Krummhau and a counter against the Krummhau.
Techniques drilled: Zornhau, Krummhau, Zornbind, first counter against the Krummhau, Thrusts.
The attacker tries to: strike a perfect Zornhau, forcing the defender into a bind. If the defender Krumps, the attacker tries to counter the Krummhau and kill the defender.
The defender tries to: strike a Zornhau or Krummhau without telegraphing, making it harder for the attacker to perceive the defenders intention. If the defender strikes a Krummhau he tries to follow up with a killing blow, or go into grappling without getting hit by the counter to the Krump.
Starting position: any upper guard from which a Zornhau can be struck.
Exercise 3:
This drills deals teaches the attacker to recognize a bad parry, which is a parry to the blade instead of the man. It is countered appropriately by using Durchwechseln.
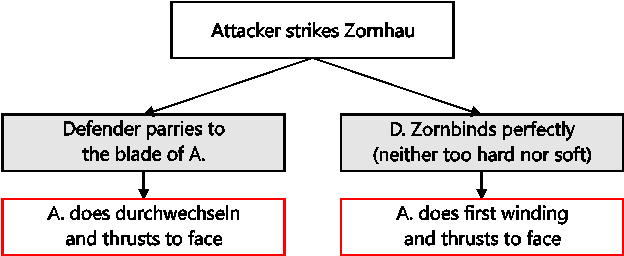
Figure 4. Bad parries are countered using Durchwechseln.
Techniques drilled: Zornhau, Zornbind, Durchwechseln, first Winding, Thrusts.
The attacker tries to: strike a perfect Zornhau and recognize a bad parry. If the defender parries badly, follow up with a Durchwechseln.
The defender tries to: either strike a perfect Zornhau or do a bad parry to the blade.
Starting position: any upper guard from which a Zornhau can be struck.
Exercise 4
In this drill the Attacker practices the Zornhau and learns to recognize the Nachreisen counter, as well as dealing with it. The defender practises the Zornhau as well and also trains the Nachreisen.
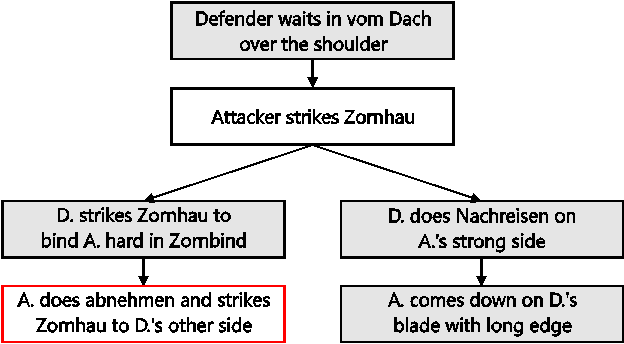
Figure 5. Striking a proper Zornhau, while learning to recognize the Nachreisen counter.
Techniques drilled:Zornhau, Nachreisen, Abnehmen, Ringeck’s falling on the long edge.
The attacker tries to: Strike a perfect Zwerchhau, do the Fühlen as fast as possible and finish with the correct follow-up technique.
The defender tries to: Do a Zornhau with a hard bind or try to Nachreisen the Attacker. The Defender tries to telegraph his Actions as little as possible, to maximise the chance to succeed in the Nachreisen Manoeuvre.
Starting position: Attacker starts in any position from which a Zornhau can be struck.
Exercise 5
This drill teaches Fühlen in the bind resulting from a Zwerchhau, testing that bind and the follow-up for the attacker for a hard and a soft bind.
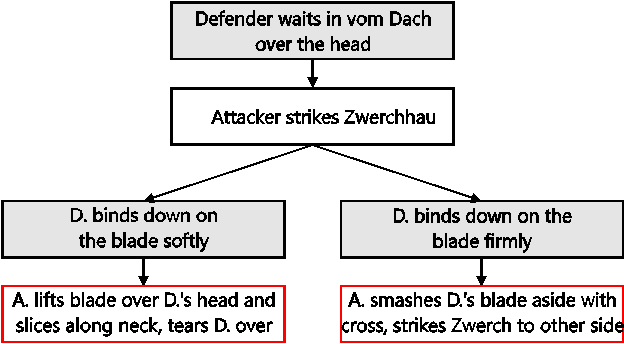
Figure 6. Striking a proper Zwerchhau, with proper follow-up, depending on whether the defender is hard or soft in the bind.
Techniques drilled: Zwerchhau, Fühlen, Binding, Abschneiden, Cross-smash.
The attacker tries to: Strike a perfect Zwerchhau, do the Fühlen as fast as possible and finish with the correct follow-up technique.
The defender tries to: Do a perfect Zwerchbind – neither to hard nor too soft – so the attacker is forced to test the bind properly.
Starting position: Attacker starts in any guard from which a Zwerchhau can be struck.
Exercise 6
In this drill the attacker practices the Schielhau, while the defender tries to disrupt the attacker.
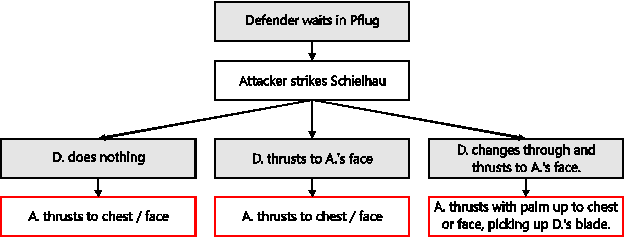
Figure 7. Practicing the Schielhau.
Techniques drilled: Schielhau, Thrusts, Changing Through
The attacker tries to: Strike a perfect Schielhau, no matter what.
The defender tries to: Disrupt the attacker, by trying to either thrust to the face, or change through and thrust to the face.
Starting position: Attacker starts in any guard from which a Schielhau can be struck.
Exercise 7
This drill teaches the defender to recognize various Zornhau variants, as well as the appropriate counters to them.

Figure 8. Learning to see the difference between various Zornhauen and a countering them.
Techniques drilled: Zornhau, Schielhau, Scheitelhau, Zornort, Thrusts.
The attacker tries to: Either strike a perfect Zornhau to the head, hip or leg. The attacker trains to telegraph as little as possible in this drill as to make it harder for the defender to come up with the correct response.
The defender tries to: Throw the correct counter at the attack and kill the assailant.
Starting position: Any position from which the attacker can strike a Zornhau.
Exercise 8
This drill teaches the defender to differentiate between a Zornhau and an Unterhau and to counter both.
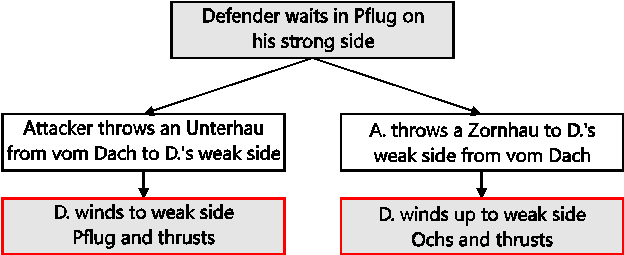
Figure 9. Countering an Unterhau or a Zornhau with the appropriate winding.
Techniques drilled: Zornhau, Unterhau, first and fifth Winding, Thrust
The attacker tries to: Not telegraph his intention as he either strikes a perfect Zornhau or a perfect Unterhau.
The defender tries to: Recognize the attack in time and counter with the appropriate Winding.
Starting position: Attacker starts in vom Dach over the shoulder on his strong side.
Exercise 9
This drill trains the defender to differentiate between a Zornhau and a Schielhau and tries to counter either. Note: while we know of no counters against the Schielhau being described in the Fechtbücher, we found that both Hängend Ort and Krone work well. These defences are practiced in this Exercise. However, we do not know whether they are optimal and cannot be sure they would work in a real fight with sharp swords.
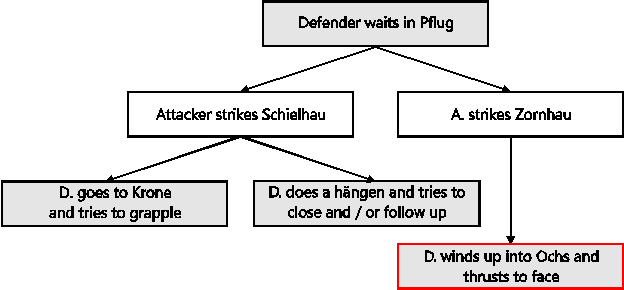
Figure 10. Differentiating between a Zornhau and a Schielhau.
Techniques drilled: Schielhau, Zornhau, Hängen, Krone, first Winding, Thrusts.
The attacker tries to: Strike a perfect Schielhau or Zornhau without telegraphing.
The defender tries to: Counter the attack and not get killed in case of the Schielhau and kill the attacker in case of a Zornhau.
Starting position: Attacker starts in any high guard.
Exercise 10
This drill practices defences against the Zornhau to the open and closed side. A strike against the closed side of the defender is extremely unlikely; however it allows the defender to practice the Wechselhau and the Abwenden. Also, sometimes a poorly done Nachreisen can turn into a situation that is very similar to a Zornhau to the closed side. On the strong side the defender practices the speed of his First Winding, as it is difficult to wind into a Zornhau that is struck with intent.
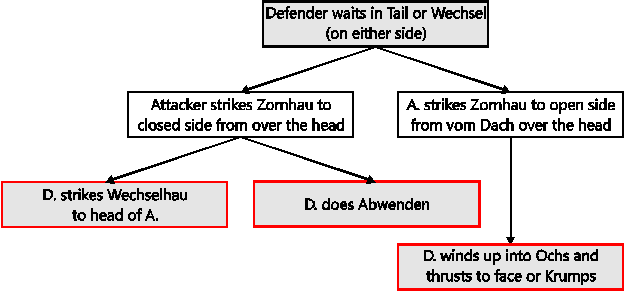
Figure 11. Defences against the Zornhau to either side of the defender.
Techniques drilled: Zornhau, Wechselhau, Abwenden, 1st Winding, Thrusts.
The attacker tries to: Strike a perfect Zornhau to either side of the defender, without telegraphing. Also, when striking to the open side, try to beat the winding of the defender.
The defender tries to: Counter the Zornhau with the appropriate technique.
Starting position: Attacker starts from vom Dach over the Head.
Exercise 11
This drill helps the defender to differentiate between a Scheitelhau and a Zornhau, as well as to counter the Zornhau.
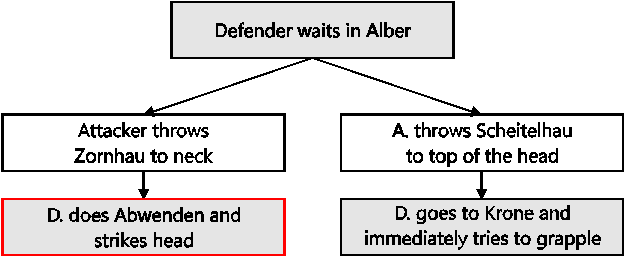
Figure 12. Recognizing Scheitelhau and Zornhau.
Techniques drilled: Scheitelhau, Zornhau, Abwenden, Krone.
The attacker tries to: Throw a perfect Zornhau or Scheitelhau without telegraphing.
The defender tries to: Throw the correct counter or block at the attack.
Starting position: Attacker starts in vom Dach over the strong shoulder.
Closing Remarks
This collection of exercises started out as a list, that was supposed to help the Calgary chapter of the AES keep track of the various reaction drills that Mark Winkelman, Stacy Stocki and I had developed over the years. Eventually I decided to make it a full paper, partially as it would fulfill some of the requirements to achieve senior scholar status, but also because everybody who tried these exercises found them to be very useful. That fact encouraged me to share this knowledge with others in the hope that they too might profit from it. The exercises described here have all been pressure tested by the authors, meaning they were analyzed and carried out with steel blunt swords at full speed and with full force. The exercises do work as described under these conditions. The drills have not been placed in a didactically relevant order, but have been sorted by attacks (exercises 1-6) and counters (7-11). The counters have been sorted by starting position of the defender, high to low. Please note that the most basic and most successful attacks are not extensively trained here. Those are the Meisterhauen, which break the four guards. The basic guard breaking exercise, in which the defender shows a guard and the attacker attacks it using the proper Meisterhau is not detailed here, because it is so simple. However, please remember that guard-breaking is the most potent offensive weapon in German Longsword. But beyond guard breaking, these drills have improved my ability to recognize attacks a lot, because they aim to train the quick recognition of counter attacks. Even when one sizes the initiative a swordsmen cannot loose track of what the opponent is doing. It is my hope, that these exercises improve the skill of any swordsman who practices them regularly. Furthermore, these drills also help recognize and counter a suicidal attack of your opponent. This is something not often trained for, but nevertheless happens fairly often. We always train with the understanding that our opponent also wants to live and win the fight. However, this assumption may not always be correct. Also a simple mistake can easily turn a valid attack into a suicidal one. The result is a double kill, which means you loose the fight and possibly your life. Training to recognize valid and invalid attacks early and instinctively helps to deal with this problem. Lastly, if you discover any problems with any of these drills or believe that I have made a mistake somewhere or if you have come up with a reaction drill of your own, please feel free to contact me. I shall be happy to review the exercises published here and make corrections where necessary. Also, if enough new drills can be collected, maybe one day either myself or someone else will publish a sequel to this paper.
Acknowledgements
I would like to thank Stacy Stocki and Mark Winkelman, who helped develop and pressure test the exercises presented here. Both also proof-read and made corrections to the manuscript. Mark also deserves thanks for assisting with the photographs in Figure 1, as does Garth Thompson.
References
-
Tobler, Christian; Fighting with the German Longsword; Chivalry Bookshelf, 2004
-
Tobler, Christian; Secrets of German Medieval Swordsmanship; Chivalry Bookshelf, 2002
-
Ringeck, Sigmund; Fechtbuch; ca 1440; Translation by Kaindel & Bellighausen